

Low Light Photography Tips
Capturing stunning images in dim environments can be challenging, but with the right approach, you can achieve impressive results even when the lighting is less than ideal. Mastering low light photography tips not only improves your technical skills but also opens creative possibilities for night scenes, indoor events, and moody portraits. This guide explores practical techniques, equipment choices, and camera settings that help you get the most out of every shot when light is scarce.
Understanding how to work with limited illumination is essential for photographers of all levels. Whether you’re shooting cityscapes after sunset, live concerts, or atmospheric interiors, knowing how to adapt your approach will make a significant difference. For those interested in the broader role of illumination in image-making, the article on using light for visual rhythm offers additional insights into creative lighting strategies.
Understanding the Challenges of Dim Environments
Photographing in low-light conditions presents unique obstacles. The most common issues include image blur from slow shutter speeds, excessive noise due to high ISO settings, and difficulty achieving accurate focus. Overcoming these hurdles requires a blend of technical knowledge and creative problem-solving.
- Motion blur occurs when the camera or subject moves during a long exposure. This is especially problematic for handheld shots.
- Digital noise increases as you raise your camera’s ISO, resulting in grainy images that may lack detail.
- Autofocus struggles in dim light, sometimes resulting in missed or soft focus points.
By understanding these challenges, you can make informed decisions about camera settings, gear, and technique to consistently produce sharp, well-exposed images.
Essential Gear for Shooting in Low Light
Having the right equipment can make a significant difference when working in dark settings. While skill and technique are crucial, certain tools can help you get the best results:
- Fast lenses with wide apertures (such as f/1.4, f/1.8, or f/2.8) allow more light to reach the sensor, enabling faster shutter speeds and lower ISO values.
- Tripods provide stability for longer exposures, reducing the risk of camera shake and blur.
- Remote shutters or self-timers help minimize vibrations when pressing the shutter button.
- External lighting such as portable LED panels or flashes can supplement available light and improve image quality.
If you’re looking to expand your lighting kit, consider exploring options like photography-specific lighting solutions to enhance your setup.
Camera Settings for Better Results in the Dark
Adjusting your camera’s settings is crucial for capturing clear, vibrant photos in low-light scenarios. Here are some key adjustments to consider:
Open Up the Aperture
Use the widest aperture available on your lens (the lowest f-number). This lets in more light, allowing you to use faster shutter speeds and lower ISO settings. A wide aperture also creates a pleasing shallow depth of field, which can add atmosphere to your images.
Increase ISO Sensitivity
Raising the ISO makes your camera sensor more sensitive to light, which is helpful in dark environments. However, higher ISO values can introduce noise. Modern cameras handle high ISO better than ever, but it’s still wise to find a balance between brightness and image quality.
Slow Down the Shutter Speed
Longer exposures allow more light to hit the sensor. If you’re using a tripod, you can safely use slower shutter speeds without worrying about camera shake. For handheld shots, try to keep the shutter speed at least as fast as the reciprocal of your focal length (for example, 1/50s for a 50mm lens).
Manual Focus When Autofocus Fails
In very dim conditions, your camera’s autofocus may struggle. Switch to manual focus and use live view with focus magnification to ensure your subject is sharp.

Creative Techniques for Low-Light Scenes
Dim environments offer unique opportunities for artistic expression. Here are some creative approaches to try:
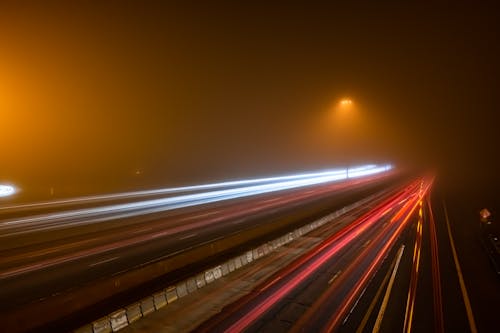
- Long exposures can capture motion trails, such as car lights or flowing water. For more on this technique, see the guide on using long exposure for water.
- Intentional blur can add drama or atmosphere. Experiment with moving your camera during exposure or capturing moving subjects. The article on creative use of blur and sharpness explores this concept further.
- Silhouettes are easier to achieve in low light, especially when your subject is backlit by a brighter background.
- Reflections and shadows become more pronounced, adding depth and interest to your compositions.
Experimenting with these methods can help you develop a distinctive style and make the most of challenging lighting conditions.
Post-Processing for Enhanced Results
Editing plays a vital role in maximizing the quality of images captured in dim conditions. Here are some tips for post-processing:
- Noise reduction tools in software like Lightroom or Photoshop can help minimize grain while preserving detail.
- Adjust exposure and contrast to bring out hidden details in shadows and highlights.
- Sharpening can help recover some crispness lost to high ISO or slight blur.
- Color correction is useful for fixing white balance issues common in artificial or mixed lighting.
Remember, subtle edits often yield the most natural-looking results. Avoid over-processing, which can introduce artifacts or unnatural tones.
Lighting Fundamentals and Further Learning
Understanding the basics of how light behaves is essential for all types of photography, but it’s especially important in low-light scenarios. The direction, quality, and color of available light all influence your final image. For a deeper dive into the science and art of illumination, check out this comprehensive overview of the importance of light in photography.
Additionally, exploring related topics like light intensity photography can further enhance your understanding and give you more control over your creative process.
Frequently Asked Questions
What camera settings work best for dark environments?
Use a wide aperture (low f-number), increase ISO sensitivity as needed, and slow down the shutter speed if possible. A tripod helps stabilize the camera for longer exposures. Manual focus can also be more reliable than autofocus in very dim situations.
How can I reduce noise in my low-light photos?
Keep ISO as low as possible while maintaining a usable shutter speed. Use noise reduction tools in post-processing software, and expose your images correctly to avoid brightening dark areas excessively in editing.
Is extra lighting always necessary for low-light photography?
Not always. While external lights can improve image quality, you can often achieve great results by using fast lenses, stabilizing your camera, and optimizing your settings. Creative use of available light, reflections, and shadows can also yield striking images without additional gear.
Can smartphones capture good photos in low light?
Modern smartphones have improved significantly in low-light performance thanks to larger sensors, advanced image processing, and features like night mode. While they may not match the quality of dedicated cameras, they can still produce impressive results with the right technique.
What’s the best way to focus in dim conditions?
Switch to manual focus and use your camera’s live view with focus magnification. If your camera has focus peaking, enable it to help identify sharp areas. Autofocus assist lamps or using a flashlight to temporarily illuminate your subject can also help.
This article contains affiliate links. We may earn a commission at no extra cost to you.
This article contains affiliate links. We may earn a commission at no extra cost to you.
This article contains affiliate links. We may earn a commission at no extra cost to you.
This article contains affiliate links. We may earn a commission at no extra cost to you.