

Light Intensity Photography
Light intensity photography is a fascinating area that explores how the strength and quality of light can transform images. Whether you’re capturing the vibrant energy of city lights at night or the subtle glow of dawn, understanding how to control and use light intensity is essential for producing compelling photos. Mastering this aspect of photography opens up creative possibilities, from dramatic contrasts to ethereal long exposures.
For those looking to expand their skills, learning about the interplay between light and subject is crucial. Techniques that leverage varying light strengths can help you create mood, highlight details, and guide the viewer’s eye. If you’re interested in related creative approaches, you might also explore creative use of blur and sharpness to further enhance your images.
Understanding the Role of Light Strength in Photography
The amount of light that reaches your camera sensor—known as light intensity—directly affects exposure, color, and mood. High-intensity light, such as midday sun, produces sharp contrasts and vivid colors, while low-intensity light, like dusk or candlelight, creates softer, more atmospheric effects. Adjusting your camera settings to suit the available light is a key skill for any photographer.
Exposure is controlled by three main factors: aperture, shutter speed, and ISO. Each setting interacts with light intensity in different ways:
- Aperture: A wider aperture (lower f-number) lets in more light, ideal for low-light situations.
- Shutter Speed: Slower shutter speeds allow more light to hit the sensor, useful for night scenes or creative motion blur.
- ISO: Increasing ISO makes the sensor more sensitive to light, but can introduce noise if set too high.
Balancing these elements helps you achieve the desired exposure and creative effect, whether you’re shooting in bright sunlight or under dim streetlights.
Creative Techniques for Capturing Light Variations
Experimenting with different light strengths can yield striking results. Here are some popular techniques that make the most of varying light:
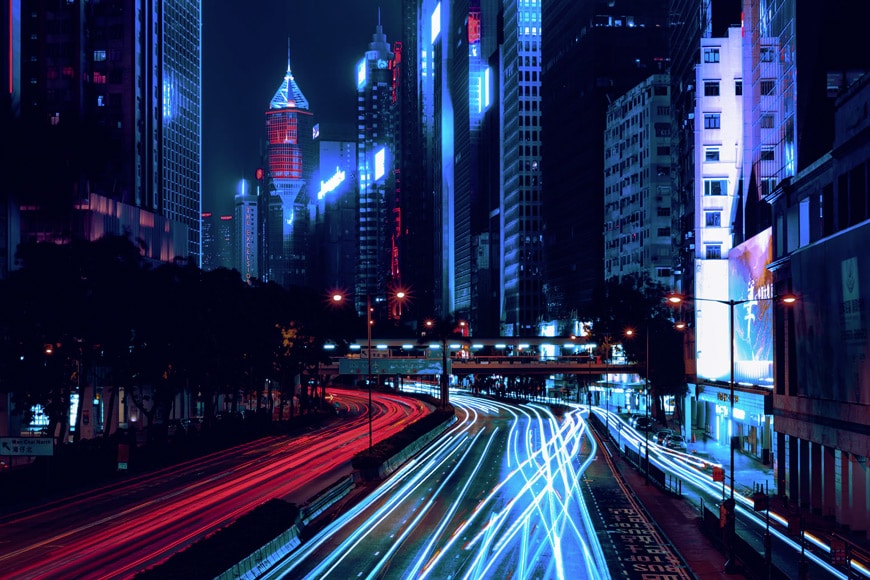
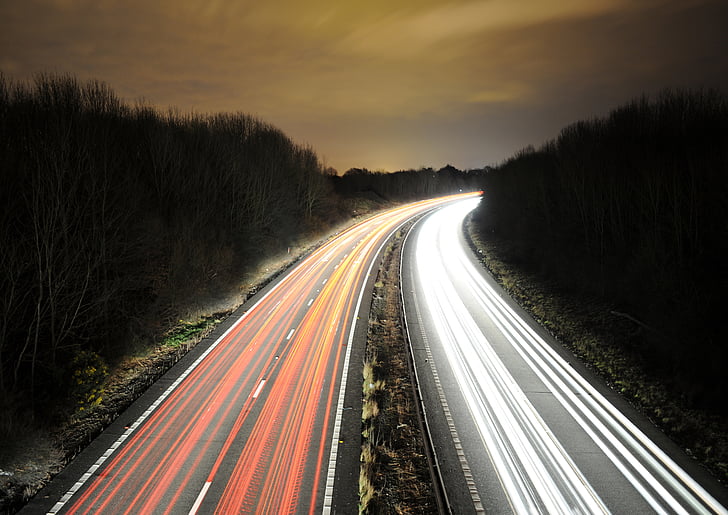
- Long Exposure: By using slow shutter speeds, you can capture light trails, smooth water, or moving clouds, emphasizing the passage of time.
- Backlighting: Placing your subject between the camera and a strong light source creates dramatic silhouettes and glowing edges.
- High-Key and Low-Key: High-key images use abundant light for a bright, airy feel, while low-key photography relies on minimal light for moody, shadow-rich scenes.
For inspiration on how to use these techniques, check out this guide on creative slow shutter shots, which demonstrates how manipulating light and time can result in unique visual effects.
Managing Exposure for Different Lighting Conditions
One of the main challenges in light intensity photography is adapting to changing environments. Here are some practical tips for handling various lighting scenarios:
- Bright Sunlight: Use a lower ISO and a smaller aperture (higher f-number) to avoid overexposure. Consider using a neutral density (ND) filter to reduce light without affecting color.
- Low Light: Open up the aperture, slow down the shutter speed, and increase ISO as needed. A tripod can help prevent blur from camera shake during long exposures.
- Mixed Lighting: Adjust white balance to ensure accurate colors, and use spot metering to expose for your subject rather than the background.
For more on how light interacts with your subject, see this in-depth explanation of light and photography.
Using Motion and Light for Dynamic Images
Combining movement with varying light strengths can produce dynamic and visually engaging photos. Techniques like panning, intentional camera movement, and capturing light trails all rely on understanding how light intensity and motion interact. For example, photographing moving cars at night with a slow shutter speed can create vibrant streaks of color, emphasizing speed and energy.
If you’re interested in capturing motion, the article on how to photograph car motion offers practical advice on settings and timing to achieve sharp subjects against blurred backgrounds.
Essential Equipment for Controlling Light
To make the most of light intensity in your photography, having the right gear can make a significant difference. Here are some tools that can help you manage and shape light:
- Tripod: Essential for long exposures and low-light conditions to keep your camera steady.
- External Flashes and LED Panels: Provide additional light when natural sources are insufficient.
- Reflectors and Diffusers: Modify the quality and direction of light, softening harsh shadows or bouncing light onto your subject.
- ND and Polarizing Filters: Control the amount of light entering the lens and reduce reflections or glare.
Investing in quality lighting equipment can help you tackle challenging scenarios and expand your creative options. If you want to experiment with water scenes, you might find tips in the guide on using long exposure for water.
Developing Your Eye for Light
Recognizing and anticipating how light will behave is a skill that develops with practice. Pay attention to how shadows fall, how colors shift at different times of day, and how artificial light sources affect your scene. Studying examples of light intensity photography can help you understand what works and inspire new ideas.
Try shooting the same subject under various lighting conditions to see how the mood and details change. Over time, you’ll become more confident in making quick adjustments to settings and composition to capture the effect you want.
For further exploration, the article on using light for visual rhythm discusses how light patterns can add structure and movement to your photos.
Frequently Asked Questions
What is light intensity in photography?
Light intensity refers to the strength or brightness of the light that illuminates a scene or subject. In photography, it determines how much light reaches the camera sensor, affecting exposure, contrast, and color. Adjusting camera settings like aperture, shutter speed, and ISO helps control the impact of light intensity on your images.
How can I photograph in low-light conditions?
In low-light situations, use a wider aperture (lower f-number), slower shutter speed, and higher ISO. A tripod is helpful to prevent blur from camera shake during longer exposures. Adding artificial light sources or using reflectors can also improve results in dim environments.
Why do my photos look washed out in bright sunlight?
Photos can appear washed out when there’s too much light, causing overexposure. To fix this, use a smaller aperture (higher f-number), lower ISO, and faster shutter speed. Neutral density filters can also help reduce the amount of light entering the lens without affecting color balance.
This article contains affiliate links. We may earn a commission at no extra cost to you.
This article contains affiliate links. We may earn a commission at no extra cost to you.
This article contains affiliate links. We may earn a commission at no extra cost to you.
This article contains affiliate links. We may earn a commission at no extra cost to you.