

Light and Movement in Landscapes
Capturing the interplay of light and movement in landscapes is a compelling way to add depth, emotion, and energy to your photography. Whether you’re photographing a windswept field, a cityscape at dusk, or a forest with shifting shadows, understanding how to use illumination and motion can transform a static scene into a dynamic visual story. This guide explores practical techniques and creative ideas to help you master these elements and elevate your landscape images.
Before diving into the technical aspects, it’s important to recognize how light shapes the mood and atmosphere of a scene, while movement introduces a sense of time and flow. By learning to balance these two factors, photographers can create images that resonate with viewers and stand out from the ordinary. For those interested in exploring related concepts, check out using light for visual rhythm for more inspiration on integrating lighting into your compositions.
Understanding the Role of Light in Dynamic Scenes
Light is the foundation of all photography, but its impact is especially pronounced when capturing scenes with motion. The direction, quality, and color of illumination can dramatically alter how movement is perceived in a landscape. For example, golden hour sunlight can create long, dramatic shadows that emphasize the flow of grass in the wind, while overcast skies produce soft, even lighting that can make water appear silky and smooth during a long exposure.
To make the most of natural illumination, observe how it changes throughout the day. Early morning and late afternoon often provide the most visually interesting conditions, with low-angle rays casting textures and highlighting movement. Artificial lighting, such as streetlights or car headlights, can also introduce unique effects in urban or night landscapes.
If you’re new to lighting techniques, consider reading this comprehensive guide to photography lighting for beginners to build a solid foundation.
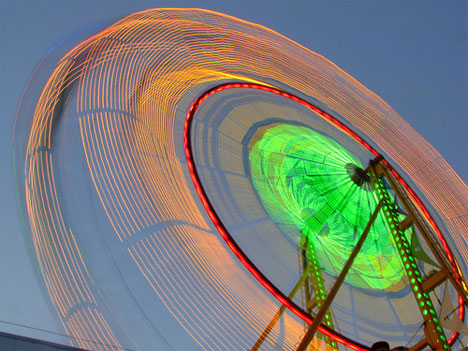
Techniques for Capturing Motion in Outdoor Photography
Incorporating movement into your landscape images can be achieved through a variety of methods. The most common approach is to use a slower shutter speed, which allows moving elements—such as water, clouds, or people—to blur, creating a sense of motion. Conversely, a fast shutter speed can freeze action, capturing crisp details even in dynamic environments.
Here are some practical tips for emphasizing motion in your photos:
- Long Exposures: Use a tripod and set your camera to a slow shutter speed (e.g., 1/2 second or longer) to blur moving water, clouds, or foliage. This technique is especially effective for rivers, waterfalls, and windy fields.
- Panning: Track a moving subject with your camera while using a slower shutter speed. This keeps the subject relatively sharp while blurring the background, highlighting the sense of speed.
- Intentional Camera Movement (ICM): Deliberately move your camera during exposure to create abstract effects, turning lights and shapes into painterly streaks.
For more ideas on blending sharpness and blur, visit creative use of blur and sharpness for advanced techniques.
Balancing Exposure for Moving Elements
When photographing scenes with both static and moving elements, exposure settings become crucial. A longer exposure will blur motion but can also risk overexposing brighter areas, especially during the day. Using neutral density (ND) filters can help reduce the amount of light entering the lens, allowing for slower shutter speeds even in bright conditions.
Pay attention to your aperture and ISO settings as well. A smaller aperture (higher f-number) increases depth of field and reduces light, while a lower ISO minimizes noise in long exposures. Experiment with different combinations to find the right balance for your scene.
To deepen your understanding of how brightness affects your images, explore light intensity photography for tips on managing exposure in challenging lighting conditions.
Creative Approaches to Light and Motion in Outdoor Scenes
Beyond technical mastery, creativity plays a significant role in making your landscape images stand out. Consider experimenting with the following ideas:
- Night Photography: Capture city lights or star trails using long exposures. Moving vehicles can create colorful streaks of light, adding vibrancy to urban landscapes.
- Reflections: Use water surfaces to mirror moving clouds or shifting sunlight, creating symmetry and visual interest.
- Weather Effects: Rain, fog, and wind can all introduce natural movement and mood. Embrace these conditions to tell a richer story.
For those interested in water photography, using long exposure for water provides detailed guidance on achieving smooth, ethereal effects in rivers, lakes, and oceans.

Practical Tips for Shooting Landscapes with Motion
To get the best results when working with light and movement in landscapes, keep these practical tips in mind:
- Always use a sturdy tripod for long exposures to prevent unwanted camera shake.
- Scout your location ahead of time to anticipate how light and motion will interact at different times of day.
- Use remote shutter releases or your camera’s timer to minimize vibration during exposure.
- Bracket your shots by taking multiple exposures at different settings, giving you more options in post-processing.
- Review your images on location to check for sharpness and desired blur effects, adjusting your technique as needed.
For those interested in photographing vehicles or fast-moving subjects, how to photograph car motion offers targeted advice for capturing dynamic automotive scenes.
Frequently Asked Questions
What is the best time of day to photograph movement in landscapes?
The most visually appealing results often occur during golden hour—shortly after sunrise or before sunset—when the light is soft and directional. This enhances textures and highlights motion, such as wind in grass or flowing water. However, night and blue hour can also produce striking effects, especially with artificial lights or long exposures.
How can I avoid overexposure when using long shutter speeds?
To prevent overexposure during long exposures, use neutral density (ND) filters to reduce the amount of light entering the lens. Additionally, set a low ISO and a small aperture (high f-number). Shooting during lower light conditions, such as early morning or late evening, also helps control brightness.
What equipment is essential for capturing light and motion in outdoor photography?
A sturdy tripod is crucial for keeping your camera steady during long exposures. ND filters allow for slower shutter speeds in bright conditions. A remote shutter release or using your camera’s timer function can help minimize vibrations. While not required, a camera with manual exposure controls offers greater flexibility for creative effects.
This article contains affiliate links. We may earn a commission at no extra cost to you.
This article contains affiliate links. We may earn a commission at no extra cost to you.
This article contains affiliate links. We may earn a commission at no extra cost to you.
This article contains affiliate links. We may earn a commission at no extra cost to you.
This article contains affiliate links. We may earn a commission at no extra cost to you.