

Exposure Bracketing for Movement
Capturing motion in photography presents unique challenges, especially when lighting conditions are unpredictable or when the scene contains both bright highlights and deep shadows. Exposure bracketing for movement is a technique that helps photographers overcome these hurdles by taking multiple shots at different exposure levels. This approach can be particularly useful when photographing moving subjects, as it increases the chances of getting a well-exposed image that preserves detail in both static and dynamic areas.
Whether you’re shooting fast-moving cars, flowing water, or bustling city scenes, understanding how to bracket exposures effectively can elevate your creative control. Before diving into the practical steps, it’s helpful to explore related concepts, such as creative use of blur and sharpness, which often goes hand-in-hand with motion photography.
What Is Exposure Bracketing and Why Use It for Moving Subjects?
Exposure bracketing involves taking a series of photographs of the same scene at different exposure settings, usually by varying the shutter speed, aperture, or ISO. The goal is to ensure that at least one image is perfectly exposed, or to combine the best parts of each shot in post-processing. When movement is involved, bracketing becomes even more valuable, as it allows you to capture fleeting moments with a range of exposures, increasing your chances of freezing action or highlighting motion trails.
For instance, in situations where lighting changes rapidly—such as during golden hour or under shifting clouds—bracketing can help you avoid blown highlights or lost shadow detail. It’s also useful when you want to experiment with different creative effects, like balancing sharpness and blur, or emphasizing the direction and speed of motion.
How to Set Up Exposure Bracketing for Dynamic Scenes
To use bracketing effectively with moving subjects, you’ll need to adjust your camera settings and shooting technique. Here’s a step-by-step approach:
- Enable Bracketing Mode: Most modern cameras have an automatic bracketing feature (often called AEB or Auto Exposure Bracketing). Activate this mode in your camera’s menu.
- Choose the Number of Shots: Decide how many exposures you want to capture—typically three (underexposed, normal, and overexposed) or five for more dynamic range.
- Set Exposure Increments: Select the exposure difference between each shot, usually in 1/3, 1/2, or 1-stop increments. For scenes with high contrast or unpredictable lighting, larger increments may be beneficial.
- Use Continuous Shooting: Set your camera to burst or continuous shooting mode. This helps minimize subject movement between frames, which is critical for later blending or selecting the best shot.
- Stabilize the Camera: Use a tripod if possible. However, when photographing fast-moving subjects, handheld shooting is often necessary—just be mindful of camera shake.
For more on how light interacts with movement, consider reading about using light for visual rhythm, which can deepen your understanding of dynamic compositions.

Balancing Motion Blur and Sharpness with Bracketing
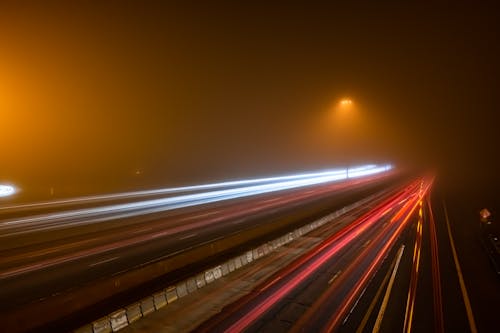
One of the main creative decisions in motion photography is how much blur or sharpness you want in your final image. Bracketing exposures allows you to experiment with different shutter speeds, capturing both crisp and blurred versions of the same scene. This is especially useful for subjects like flowing water, moving vehicles, or people in action.
For example, a faster shutter speed will freeze the subject, while a slower one will introduce motion blur. By bracketing, you can later choose the image that best matches your creative intent, or even blend elements from multiple exposures for a composite effect. For more inspiration on this technique, explore our article on creative slow shutter shots.
Tips for Successful Exposure Bracketing with Movement
- Anticipate the Action: Pre-focus on the area where the movement will occur. This reduces lag and helps ensure sharpness in at least one bracketed shot.
- Use Manual Mode: Manual exposure gives you full control over shutter speed, aperture, and ISO, making it easier to predict the results of each bracketed image.
- Monitor Lighting Conditions: Rapidly changing light can affect your bracketed sequence. Adjust your settings as needed and consider using exposure compensation.
- Review Your Shots: After each burst, check your images for both exposure and motion blur. This helps you fine-tune your approach on the spot.
- Consider Post-Processing: Software like Adobe Lightroom or Photoshop can help you blend exposures or select the best frame. This is particularly useful when dealing with complex scenes or when you want to merge sharp and blurred elements.
Common Challenges and How to Overcome Them
While bracketing is a powerful tool, it comes with its own set of challenges when used with moving subjects:
- Ghosting: If your subject moves significantly between exposures, you may see ghosting when blending images. To minimize this, shoot in rapid burst mode and keep bracket intervals small.
- Camera Shake: Handheld bracketing can introduce blur. Use image stabilization if available, or increase your shutter speed to compensate.
- File Management: Bracketing quickly fills up memory cards. Organize your files and review them regularly to avoid confusion later.
Understanding the interplay between light and movement is crucial. For a deeper dive into how lighting affects your results, check out this comprehensive guide to understanding light.
Practical Applications and Creative Ideas
Exposure bracketing isn’t just for technical problem-solving—it’s also a gateway to creative experimentation. Here are a few ways to use this technique with movement:
- HDR with Motion: Combine bracketed exposures to create high dynamic range images that retain detail in both highlights and shadows, even with moving elements.
- Selective Blending: Use software to blend only certain parts of each exposure, such as keeping a moving subject sharp while allowing the background to blur.
- Time-Lapse and Action Sequences: Bracketed shots can be used to build time-lapse videos or composite images showing the progression of movement.
For those interested in capturing specific types of motion, such as vehicles, our resource on how to photograph car motion offers targeted advice.
Integrating Bracketing with Other Motion Techniques
Bracketing can be combined with other motion photography techniques for even more creative results. For example, using neutral density filters allows for longer exposures during daylight, enhancing motion blur. Pairing bracketing with intentional camera movement can produce abstract effects. If you’re interested in water photography, see our article on using long exposure for water for more ideas.
FAQ
Can I use exposure bracketing for handheld shooting with moving subjects?
Yes, you can bracket exposures while shooting handheld, especially if your camera has a fast burst mode. However, be mindful of camera shake and try to keep your hands steady. Some cameras offer in-body stabilization, which can help reduce blur.
What’s the best number of exposures to bracket for motion photography?
Three exposures (one underexposed, one normal, one overexposed) are usually sufficient for most situations. For scenes with extreme contrast or unpredictable lighting, five or more exposures may offer better results.
How do I blend bracketed exposures with moving subjects?
Blending exposures with movement can be tricky due to ghosting. Use software with advanced masking tools to selectively combine the sharpest or most appealing parts of each exposure. Manual blending often yields the best results, especially for complex scenes.
This article contains affiliate links. We may earn a commission at no extra cost to you.
This article contains affiliate links. We may earn a commission at no extra cost to you.
This article contains affiliate links. We may earn a commission at no extra cost to you.
This article contains affiliate links. We may earn a commission at no extra cost to you.