

Long Exposure Photography Tips
Capturing the world in motion can transform ordinary scenes into extraordinary works of art. Long exposure photography tips help photographers create images where time appears to stretch, revealing light trails, silky water, and dreamy nightscapes. Whether you’re a beginner or looking to refine your technique, understanding the fundamentals and best practices is essential for success in this creative genre.
This guide covers the essential gear, camera settings, and practical advice to help you master slow shutter techniques. You’ll also find answers to common questions and discover resources for exploring light and exposure even further. For a deeper understanding of how different types of lighting impact your images, check out types of lighting in photography for additional insights.
Understanding the Basics of Slow Shutter Photography
At its core, long exposure involves using a slow shutter speed to allow more light to hit your camera’s sensor over an extended period. This technique blurs moving subjects while keeping stationary objects sharp, resulting in unique visual effects. Common subjects include flowing water, car light trails, star trails, and bustling city scenes at night.
To achieve these results, you’ll need to control three main camera settings:
- Shutter Speed: The most critical setting. Typical values range from 1 second to several minutes, depending on the desired effect.
- Aperture: A smaller aperture (higher f-number) helps maintain sharpness and controls the amount of light entering the lens.
- ISO: Use the lowest ISO possible to minimize noise, especially during longer exposures.
Essential Equipment for Capturing Motion
Having the right gear makes a significant difference in your results. Here’s what you’ll need for effective long exposure work:
- Sturdy Tripod: Prevents camera shake during long exposures.
- Remote Shutter Release or Self-Timer: Minimizes vibrations caused by pressing the shutter button.
- Neutral Density (ND) Filters: Reduces the amount of light entering the lens, allowing for longer shutter speeds even in bright conditions.
- Lens Hood: Helps prevent lens flare and stray light from affecting your shot.
For more on how different lighting conditions affect your images, you might find how light affects photography helpful as you experiment with various environments.
Camera Settings for Creative Results
Applying the right settings is crucial for achieving sharp, well-exposed images with beautiful motion blur. Here are some practical long exposure photography tips for dialing in your camera:
- Manual Mode: Gives you full control over shutter speed, aperture, and ISO.
- Bulb Mode: Useful for exposures longer than 30 seconds; the shutter stays open as long as you hold the release.
- Focus Manually: Autofocus can struggle in low light. Focus before switching to manual mode to lock it in.
- Use Mirror Lock-Up: For DSLR users, this reduces vibrations caused by the mirror movement.
- Enable Long Exposure Noise Reduction: Helps reduce digital noise, especially for exposures over 1 minute.
Experiment with different combinations to see how they affect your images. For example, a 10-second exposure will create subtle motion blur, while several minutes can turn moving water into a glassy surface or capture dramatic star trails.
Choosing the Right Scene and Timing
Not every subject is suited for this technique. The most compelling images often involve elements that move—water, clouds, traffic, or crowds—contrasted against static backgrounds. Consider these scenarios:
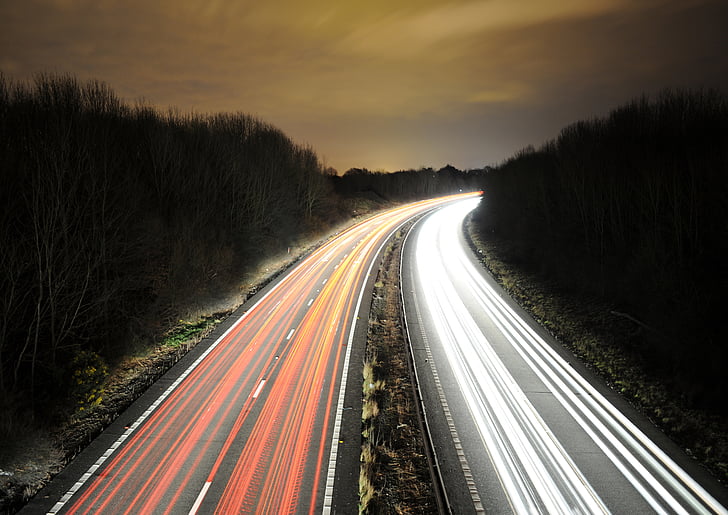
- Waterfalls and Rivers: Slow shutter speeds turn rushing water into a silky, ethereal flow.
- City Streets at Night: Capture streaks of car lights and illuminated buildings.
- Star Trails: Point your camera at the night sky for mesmerizing patterns.
- Cloud Movement: Long exposures during the day (with ND filters) can create surreal, streaked skies.
Planning is key. Use weather apps to anticipate cloud cover, and scout locations ahead of time. Arriving early allows you to set up your gear and compose your shot without rushing.
Lighting Considerations for Extended Exposures
Lighting plays a crucial role in the outcome of your images. Shooting at sunrise, sunset, or at night often yields the most dramatic results, as the lower light levels make it easier to use slow shutter speeds without overexposing your shot. If you’re interested in exploring the differences between natural and artificial sources, you can read more in natural light vs artificial light.
When shooting during the day, ND filters are invaluable. They allow you to use longer exposures by blocking out some of the incoming light. Experiment with different filter strengths to achieve the effect you want. If you’re curious about working with sunlight, using sunlight in photography offers practical advice for outdoor shoots.
For more advanced guidance on working with available light, consider this comprehensive tutorial on natural light photography.
Common Mistakes and How to Avoid Them
Even experienced photographers can encounter challenges with long exposure work. Here are some frequent pitfalls and how to prevent them:
- Camera Shake: Always use a tripod and remote release or timer to avoid blur from movement.
- Overexposure: Use ND filters and check your histogram to ensure highlights aren’t blown out.
- Unwanted Light Leaks: Cover your viewfinder during exposures to prevent stray light from entering.
- Focus Issues: Set focus before switching to manual, especially in low light.
- Dirty Lens or Filters: Clean your gear before shooting to avoid distracting spots in your images.
Review your shots on your camera’s LCD and zoom in to check for sharpness and exposure. Adjust your settings as needed and don’t be afraid to experiment.
Frequently Asked Questions
What is the ideal shutter speed for capturing light trails?
The best shutter speed depends on the speed of the moving lights and the effect you want. For car light trails, exposures between 5 and 30 seconds usually work well. Experiment to find the right balance between brightness and trail length.
Do I always need an ND filter for long exposures?
ND filters are essential for daytime long exposures, as they help prevent overexposure. At night or in low light, you can often use slow shutter speeds without a filter. However, for creative effects in bright conditions, ND filters are highly recommended.
How can I reduce noise in my long exposure images?
Use the lowest possible ISO setting, enable long exposure noise reduction in your camera, and keep your sensor clean. Shooting in RAW format also allows for better noise reduction during post-processing.
Conclusion
Mastering the art of slow shutter photography opens up a world of creative possibilities. By understanding your camera’s settings, using the right equipment, and planning your shots, you can capture stunning images that reveal the beauty of motion and time. Remember to experiment, review your results, and keep refining your technique. With these long exposure photography tips, you’ll be well on your way to creating memorable and impactful photographs.
This article contains affiliate links. We may earn a commission at no extra cost to you.