

Blur vs Sharpness in Photography
Understanding the balance between blur and sharpness is fundamental for photographers at every level. These two qualities shape the mood, focus, and storytelling power of an image. Whether you’re capturing motion, emphasizing a subject, or creating dreamy backgrounds, knowing when and how to use each effect can elevate your work. This guide explores the creative and technical aspects of both, helping you make informed choices for your next photo session.
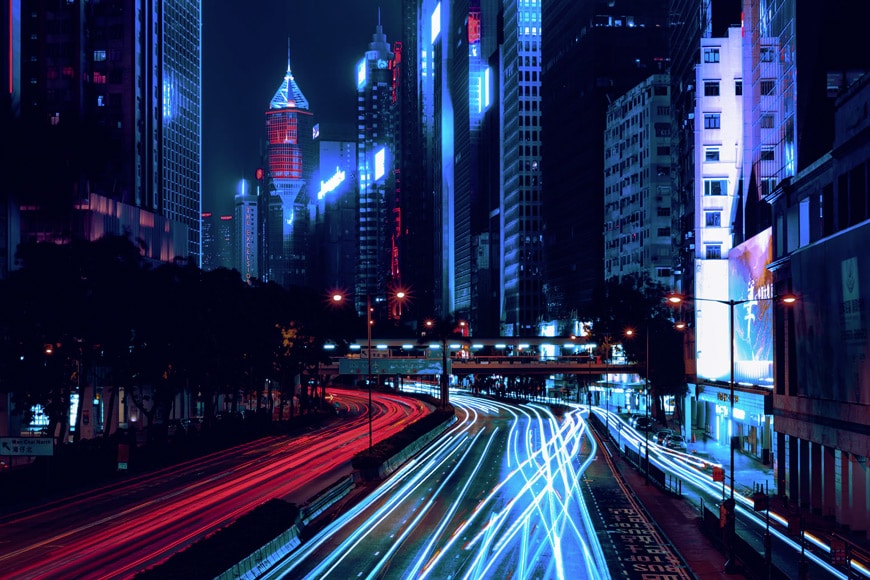
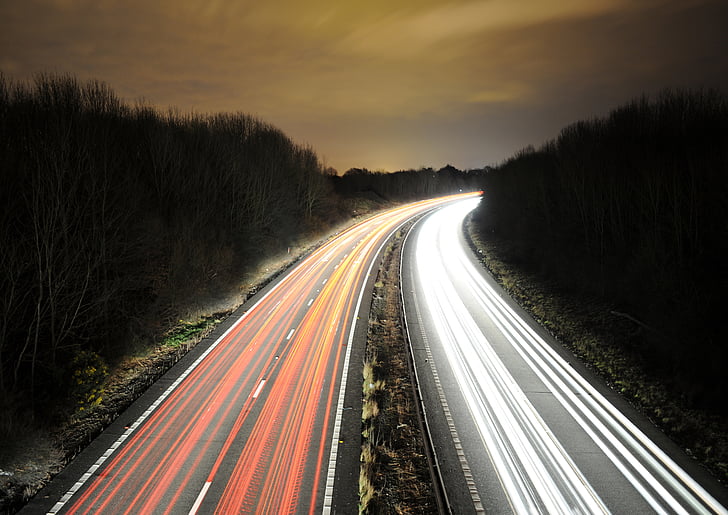
Before diving deeper, it's worth noting that mastering these concepts also opens doors to advanced techniques like long exposure night shots, where intentional blur and razor-sharp details often coexist for dramatic effect.
Defining Blur and Sharpness in Image Making
In the world of photography, blur refers to areas of an image that lack clear definition or appear out of focus. This can be intentional, such as with motion blur or background bokeh, or accidental, resulting from camera shake or missed focus. Sharpness, on the other hand, describes the clarity and crispness of details within a photo. It’s often sought after for subjects that need to stand out or when documenting intricate textures.
Both qualities are tools in a photographer’s arsenal. The key is knowing when to use each to best serve your creative vision.
Creative Uses for Blur in Your Photos
Intentional blur can add a sense of movement, depth, or mood to your images. Here are some common ways photographers use blur creatively:
- Motion Blur: Capturing moving subjects with a slower shutter speed creates streaks or trails, emphasizing speed or direction.
- Bokeh: Using a wide aperture to blur backgrounds, isolating the subject and giving portraits or macro shots a dreamy quality.
- Panning: Moving the camera along with a subject during exposure keeps the subject relatively sharp while blurring the background, highlighting movement.
- Soft Focus: Deliberately reducing sharpness for a romantic or vintage look, often used in portraiture.
Why Sharpness Matters for Impactful Images
While blur can be expressive, sharpness is often crucial for images where detail and clarity are paramount. Here’s why photographers strive for sharp results in many situations:
- Highlighting Details: Product, landscape, and architectural photography rely on crispness to showcase textures and fine elements.
- Directing Attention: A sharp subject against a blurred background draws the viewer’s eye exactly where you want it.
- Professionalism: In commercial or documentary work, sharpness is often associated with technical skill and quality.
- Printing: High-resolution, sharp images reproduce better in large prints or publications.
Achieving maximum sharpness involves careful focusing, using the right aperture, and stabilizing your camera—whether with a tripod or fast shutter speeds. For more on lighting’s role in sharpness, see this comprehensive guide to light in photography.
Technical Factors Influencing Blur and Sharpness
Several camera settings and environmental factors determine whether your photo ends up sharp or blurred. Understanding these helps you take control of your results:
| Factor | Effect on Blur | Effect on Sharpness |
|---|---|---|
| Shutter Speed | Slower speeds increase motion blur | Faster speeds freeze action for crisp details |
| Aperture | Wide apertures (low f-numbers) create shallow depth of field and background blur | Mid-range apertures (f/5.6–f/11) often yield sharpest results |
| Focus | Missed or incorrect focus leads to unintended blur | Accurate focus ensures subject clarity |
| Camera Stability | Handheld shots at slow speeds introduce shake blur | Tripods or image stabilization reduce blur |
| Lens Quality | Poor optics can soften images | High-quality lenses deliver better sharpness |
When to Choose Blur Over Sharpness
There’s no universal rule—your creative intent should guide the choice. Here are scenarios where embracing blur can enhance your photos:
- Conveying Motion: Sports, dance, or street scenes often benefit from visible movement.
- Creating Atmosphere: Nightlife, city lights, or rainy scenes can use blur for mood and abstraction.
- Artistic Expression: Abstract photography thrives on unconventional use of focus and blur.
- Storytelling: Sometimes, what’s left unclear in a photo can be as powerful as what’s sharp.
For those interested in exploring nature’s dynamic scenes, our article on motion photography in nature provides practical tips for capturing movement with intention.
Tips for Achieving the Right Balance
Finding the sweet spot between blur and sharpness is often about experimentation and knowing your tools. Here are some practical suggestions:
- Use manual focus for precision, especially in low light or macro work.
- Experiment with aperture priority mode to control depth of field and background blur.
- Try panning with moving subjects to combine sharpness and motion blur in a single frame.
- Review images at 100% on your camera’s LCD or computer to check for unwanted softness.
- Invest in a sturdy tripod for long exposures or low-light conditions.
Lighting is a critical factor. Proper illumination not only helps achieve sharpness but also allows for creative effects with blur. If you’re new to studio setups, our resource on softbox lighting setup can help you get started.
Common Mistakes and How to Avoid Them
Even experienced photographers sometimes struggle to get the desired result. Here are a few pitfalls and solutions:
- Unintentional Camera Shake: Use a faster shutter speed or stabilization tools.
- Wrong Focus Point: Double-check your focus before pressing the shutter.
- Overusing Blur: Too much can distract from the subject—use it purposefully.
- Ignoring Lens Quality: Invest in good glass for consistently sharp images.
- Neglecting Lighting: Poor light can make both blur and sharpness harder to control. Consider upgrading your lighting gear for better results.
FAQ
How do I intentionally create blur in my photos?
To add blur, use a slower shutter speed for motion blur, or a wide aperture (low f-number) for background blur. Panning the camera with a moving subject can also create dynamic effects. Remember to stabilize your camera if you want only certain parts of the image to be blurred.
What settings help me achieve maximum sharpness?
For sharp results, use a fast shutter speed to freeze motion, a mid-range aperture (like f/8), and focus carefully on your subject. Using a tripod and high-quality lens also contributes to overall image clarity.
Can I fix blur or sharpness issues in post-processing?
Some minor blur can be reduced with sharpening tools in editing software, but it’s best to get it right in-camera. Excessive blur, especially from missed focus or heavy camera shake, is difficult to correct after the fact.
Is it possible to combine blur and sharpness in a single image?
Absolutely. Techniques like panning, selective focus, and long exposures allow you to keep parts of an image sharp while blurring others. This approach can add drama and direct the viewer’s attention.
How does lighting affect blur and sharpness?
Good lighting enables faster shutter speeds and smaller apertures, both of which help achieve sharp images. Creative lighting can also enhance the mood of blurred scenes. For more on this, see our article on understanding strobe lighting.
Mastering the interplay between blur and sharpness is about understanding your tools, practicing with intention, and knowing how each element serves your creative goals. With these insights, you’ll be better equipped to capture images that stand out—whether they’re tack-sharp, beautifully blurred, or a compelling mix of both.
This article contains affiliate links. We may earn a commission at no extra cost to you.